Chop
It and Drop It! Chop
It and Drop It! |
by Richard
Rose
Associate Editor
Beginner Bikes Magazine
A
Beginner's Guide to Lowering Your Bike
Regardless
of your reason for lowering your bike, it's not a task to be taken
lightly. If you're unsure of the dynamics involved in these mods,
consult a suspension specialist to avoid any safety problems. Most
of this info was garnered from a magazine article:
| Lowering
The Front End |
First
and foremost, a general rule: Never lower the front end without
lowering the rear. You can lower the rear without lowering the
front, and what this does is give the bike a more chopper-esque
effect. Think of the bike as a triangle, with the flat line at
the bottom being your wheelbase and the one angled side being
the tank/seat and the other being your front end: as you tilt
the rear portion downwards the rake (angle of your steering axis/fork
tubes) becomes less steeper in retrospect to a perpendicular line
to the ground, thereby increasing the angle in relation to the
perpendicular axis.
But
if you just lower the front end while leaving the rear stock,you
now unbalance the bike the wrong way. This impairs the bike's
braking ability, as the bike will dive forward under hard braking,
and to have the bike in an already "diving forward"
position places even more stress onto the front when braking,
and a loss of control is more probable under these conditions
(especially if braking while in a turn or curve). We'd all like
to avoid any unneccesary "nipple surfing" so abide by
this one...
There
are several methods to lowering the front. The least expensive
(actually it's free), assuming the design allows for it, is to
drop the fork tubes through the triple trees, but this doesn't
really look too appealing with an inch or two of fork tube jutting
up from your custom's upper triple tree and through the handlebars...
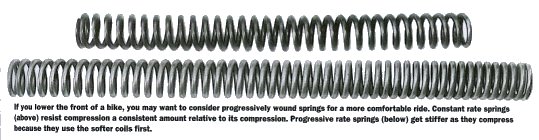
The
most popular method is swapping the coil springs inside the fork.
You'll want to consider progressively wound springs over constant
wound springs, as the progressively wound coils get stiffer as
they compress as they use the softer coils first. (see Fork Lowering
Illustration 2)
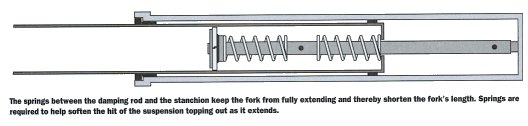
Some
bikes come with pre-load spacers that compress when the fork springs
an inch or more when unloaded. Shortening this spacer drops the
front end of a bike an amount roughly equal to what is removed
from the spacer. Be careful not to go beyond the point where there
is minimal pressure on the spring when the suspension is fully
extended (see Fork Lowering Illustration 1). If you go beyond
this point, your bike will be effectively "springless"
when the front end extends completely, as when the front wheel
drops into a dip in the road at speed. Not a nice scenario...
One
final note about front end lowering, make sure your fender (or
tire if no fender) does not make contact with the lower triple
clamp when the suspension is fully compressed. If it does it will
lock up the front wheel while in motion over bumps and other obstacles
that would be better off tackled with a free spinning wheel.
| Lowering
The Rear End |
Lowering
the rear is typically what many riders need, since lowering the
rear end also lowers the seat height, making it easier to flat-foot
a bike at a stop. If you've ever found yourself on a too-tall
machine at a slippery intersection, you know you'd trade in all
the shiny chrome in the world for more secure footing.
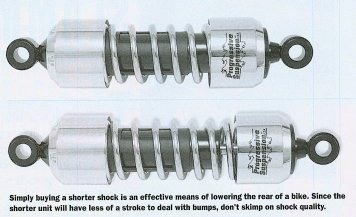 Probably
the best method is shorter shocks or shorter mounting clamps on
the shocks. Just make sure the shorter shock is designed for your
particular model, as they need to be able to sustain the mass
of the bike to work properly. This means you don't want to lower
your big tourer with a pair of 250 Rebel shocks that are 2"
shorter than yours; those shocks are meant for a 300 pound bike
and will turn your touring machine into a bottomed out hardtail...the
same holds true with shorter shocks from a larger machine installed
on a smaller one, a shock made for a 600+ pound bike won't be
compressing much on a 300-400 pound bike. Probably
the best method is shorter shocks or shorter mounting clamps on
the shocks. Just make sure the shorter shock is designed for your
particular model, as they need to be able to sustain the mass
of the bike to work properly. This means you don't want to lower
your big tourer with a pair of 250 Rebel shocks that are 2"
shorter than yours; those shocks are meant for a 300 pound bike
and will turn your touring machine into a bottomed out hardtail...the
same holds true with shorter shocks from a larger machine installed
on a smaller one, a shock made for a 600+ pound bike won't be
compressing much on a 300-400 pound bike.
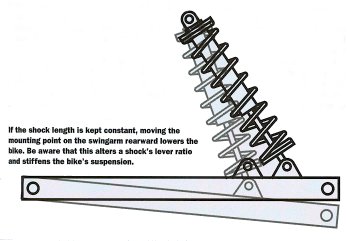 LEVER
RATIO: A shock's lever ratio is determined by the
angle at which it is mounted. To better understand this, picture
a bike's rear suspension: including the swingarm pivot, rear shock
lower mount, and the rear axle. Now imagine the rear wheel moving
through it's travel, which describes an arc, and draw that arc.
The distance the rear axle travels is most often greater than
the distance traveled by the shock's lower mount. At the extreme,
the shock mount might move about two inches versus the rear axle's
four inches. (see Rear Lowering Illustration 2) LEVER
RATIO: A shock's lever ratio is determined by the
angle at which it is mounted. To better understand this, picture
a bike's rear suspension: including the swingarm pivot, rear shock
lower mount, and the rear axle. Now imagine the rear wheel moving
through it's travel, which describes an arc, and draw that arc.
The distance the rear axle travels is most often greater than
the distance traveled by the shock's lower mount. At the extreme,
the shock mount might move about two inches versus the rear axle's
four inches. (see Rear Lowering Illustration 2)
This
means there is no simple formula to lowering your rear end, it's
not as simple as "I want to lower the rear by 2" so
I'll buy 2" shorter shocks." On a bike such as the Honda
Valkyrie, the lever ratio is 1.5:1 so a 1" shorter than stock
shock will lower the bike an inch and a half. Most bikes have
a ratio greater than 1:1, and on a mono-shock type bike (such
as the 650 V-Star or VT-600 Shadow) the ratio can be anywhere
from 2.5:1 up to near 4:1, so to lower a bike like this the shock
won't need to be as short, 1/4" shorter shocks will drop
an inch on a 4:1 ratio bike. Probably the easiest bike to do the
math on is the FLH Harleys, they are pretty close to 1:1 lever
ratio.
| Aftermath
Of Lowering |
Lowering
a bike lowers its center of gravity, so it will handle better
in some circumstances. It also lowers its ground clearance, so
this mod both helps AND hinders your handling characteristics.
Things you used to clear before such as speed bumps or curbs may
now become a problem. Your lean angle is also narrowed so if you
drag pegs on occasion you'll be be doing so more frequently...and
if you've dragged solid parts in the past such as pipes or sidestands
you may want to really consider what you're getting into.
Another
item you'll discover on your newly lowered machine is the comfort,
you've given up travel so the suspension is now stiffer (or your
pre-load will need to be adjusted accordingly to prevent bottoming
out).
Also
noteworthy is the lowered bike's load capacity. Two up touring
won't be an option on a lowered bike, the additional weight on
the rear will cause the bike to bottom out easier.
One
more consideration, when lowering you may have to modify or swap
out the side stand. A bike that sits too low on it's OEM kickstand
will lean in a near upright position when parked, and this is
rather precarious for comfort and ease of mind.
Editor's
note: Beginners should take great care with any bike modification
and strongly consider consulting a professional or their local
motorcycle dealer. |